In part 2 we got MikoPBX running. Time to connect the first phone. And not just any phone: a T65, the phone that stood in nearly every Dutch living room in the 1970s and 1980s. In this part we connect it to MikoPBX with a Cisco ATA186 analog telephone adapter.

What you need
- A Cisco ATA186 with SIP firmware, version 3 or higher. The ATA186 was sold with firmware for several protocols. Updating an adapter that Cisco stopped supporting long ago is a hassle I wanted to avoid, so I specifically looked for second-hand units that already had SIP firmware. Mine run version 3.02.01.
- A T65-TDK, the push-button version. (TDK stands for Toon-Druktoets-Keuze: tone push-button dialing.) It dials with tones (DTMF), which the ATA understands. A rotary T65 dials with pulses, and the ATA186 can’t handle those.1
- A network connection for the ATA. One of my ATAs is connected wirelessly. Well, sort of: it’s connected to the Ethernet port of one of my Omada access points, which connects to the rest of the network over Wi-Fi.
The ATA186 has two phone ports, but I only use the first one on each adapter. I used two ATAs instead of one so I didn’t have to run phone cables through the house.

Keep in mind that “modern” telephone devices, such as ATAs, use RJ11 plugs, while older European phones come with all sorts of odd plugs: every national phone company seems to have designed its own. The Dutch PTT used a four-pin plug, and most T65s still have one. For one of my T65s I already had an adapter. The other had a broken cord, so I simply replaced it with one that already had an RJ11 plug.
Step 1: create an extension in MikoPBX
In MikoPBX, go to Extensions and click Add new employee. Fill in a name and a number from your numbering plan. The phone in my kitchen gets 21. MikoPBX generates a SIP password for you. You’ll need it in a minute.
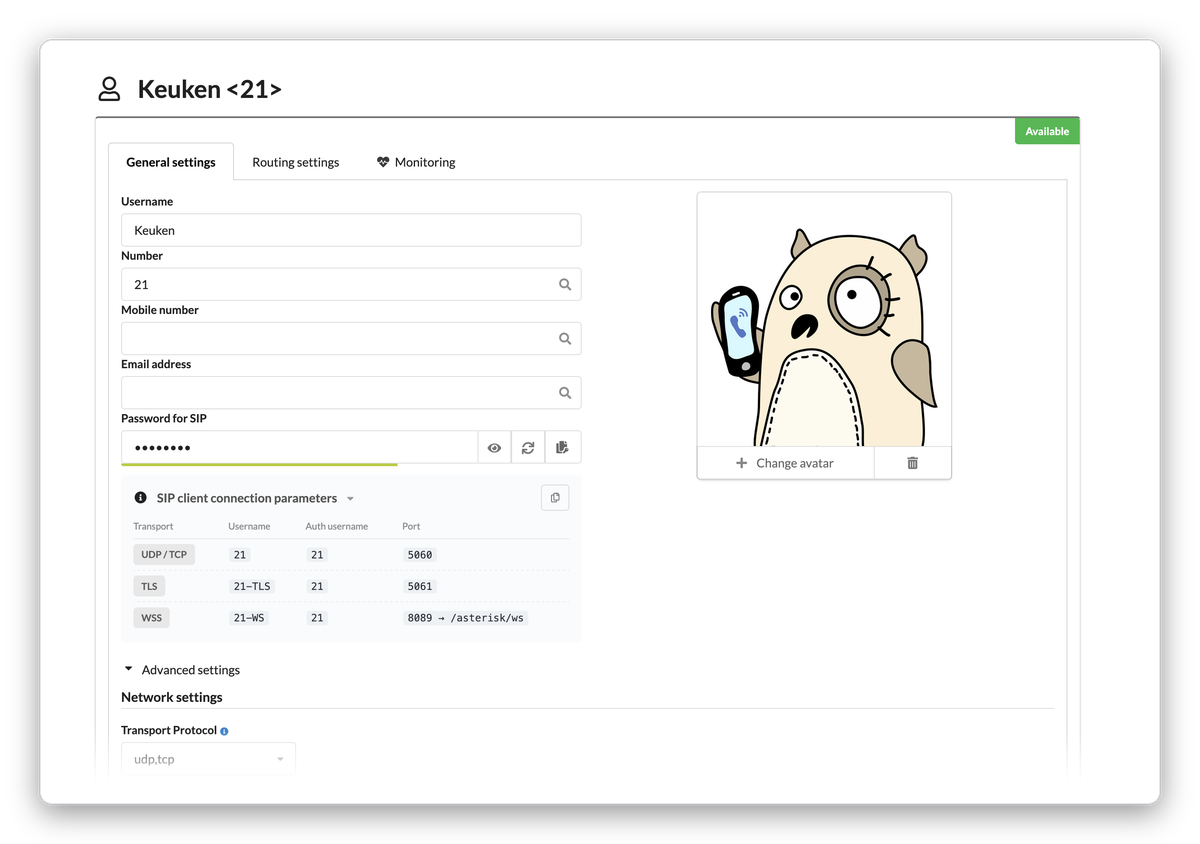
Most settings can stay at their defaults. Under Advanced settings, I changed two things:
- Network filter: set to my internal network. The ATA is always inside the house, so there’s no reason to accept registrations for this extension from anywhere else. More on that below.
- Record all employee calls: switched off. I don’t need recordings of calls in my own kitchen.
Creating a network filter
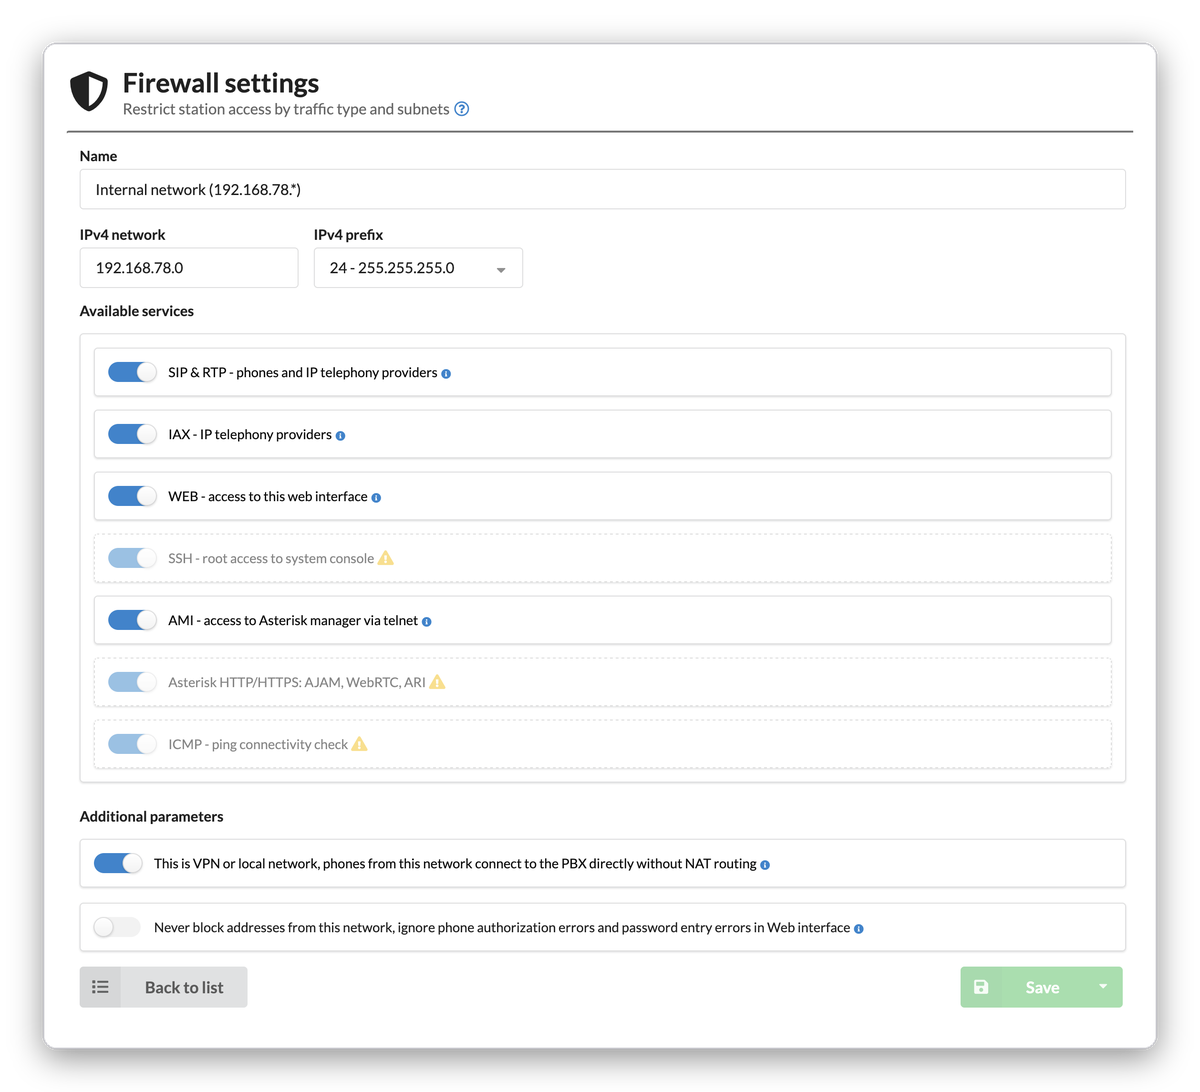
The network filter list shows the networks you’ve defined in MikoPBX’s firewall. If your home network isn’t in there yet, create it first:
- Go to Network and Firewall → Firewall and add a new rule.
- Give it a name, like Internal network, and enter your home network: the network address under IPv4 network and the prefix under IPv4 prefix. For most home networks that’s something like
192.168.1.0and24. - Under the available services, allow at least SIP&RTP, so phones can register and talk. Also allow WEB if you want to reach the web interface from your home network.
- Under Additional parameters, switch on This is VPN or local network. Phones on this network then connect to MikoPBX directly, without NAT. Leave Never block addresses from this network off: that way MikoPBX still blocks a device that keeps trying wrong passwords, even inside your own network.
- Save the rule.
The new network now appears in the network filter list of every extension. More details are in the MikoPBX firewall documentation.
Step 2: find the ATA on the network
The ATA186 has a voice menu that you operate with the phone itself. Connect the T65 to the first phone port, pick up the handset and press the button on top of the ATA. Then dial 21#. The ATA reads out its IP address.
Open http://<ip-of-the-ata>/dev in your browser to get to the configuration pages. Check the title: it should say Cisco ATA 186 (SIP). The firmware version is listed under Device Information.
Step 3: SIP parameters
The SIP Parameters page connects the ATA to MikoPBX. The settings that matter:
| Parameter | Value | What it does |
|---|---|---|
UID0 |
21 |
The extension number for the first phone port |
PWD0 |
the SIP password | The password MikoPBX generated in step 1 |
DisplayName0 |
keuken |
The name others see when this phone calls |
SIPRegOn |
1 |
Register with MikoPBX, so the phone can be called |
Proxy |
the IP address of the NAS | Where MikoPBX lives |
SIPPort |
5060 |
The SIP port of MikoPBX |
The second port is not used, so UID1 stays at 0.
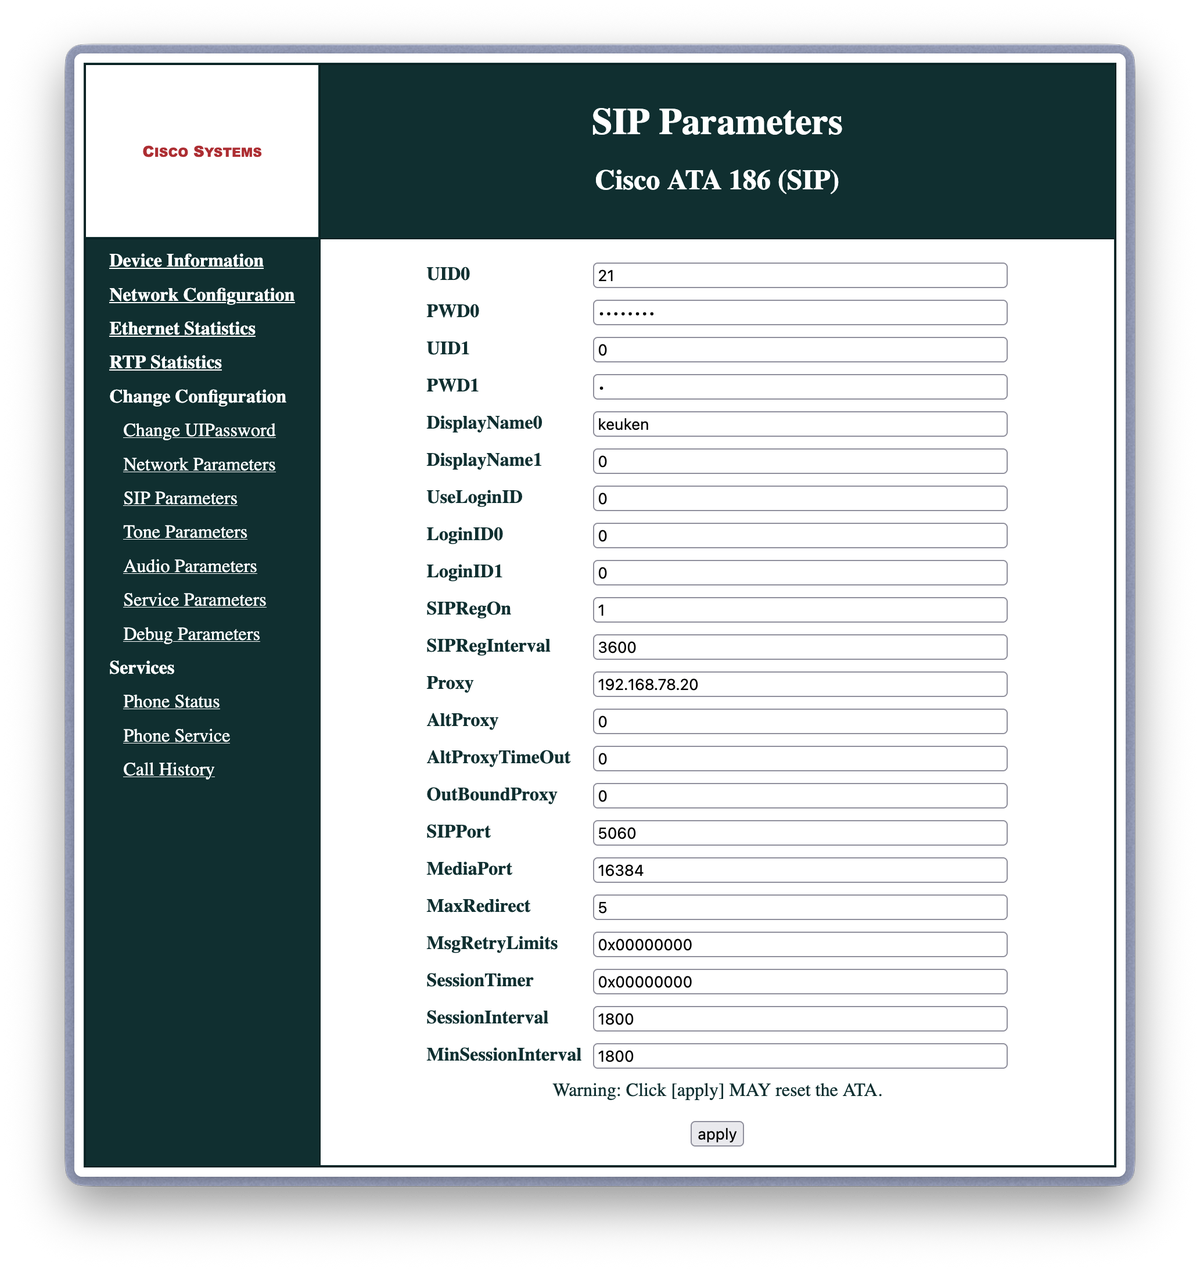
Click apply. As the page warns, the ATA may restart. When it’s back, the extension in MikoPBX should show as available.
Step 4: Dutch tones
Pick up the phone now and you’ll hear an American dial tone. That works, but it doesn’t sound right on a T65. Luckily, the ATA lets you customize the tones on the Tone Parameters page, and these are the Dutch values I use:
DialTone      1,30958,0,3125,0,1,0,0,0,0
BusyTone      1,30958,0,1757,0,0,4000,4000,0,0,0
ReorderTone   1,30958,0,1757,0,0,2000,2000,0,0,0,0,0,0,0,0
RingBackTone  1,30958,0,4839,0,0,8000,32000,0,0,0
RingOnOffTime 1,4,25
Curious what they sound like? Pick a preset and press play, or enter your own values. The American dial tone is there for comparison. The player also shows the coefficients and sample counts you'd enter in the ATA.
The format looks cryptic, but it’s not that hard. The first number is the number of frequencies: Dutch tones use a single one. The second number is the frequency, encoded as 32767 × cos(2π × f / 8000). For the Dutch 425 Hz3, that’s 30958. The fourth number is the volume. Further on are the on and off times, counted in samples of 1/8000 of a second. So 4000 means half a second: the busy tone is 425 Hz, half a second on and half a second off. The ringback tone, which you hear while the other side rings, is one second on and four seconds off (8000 and 32000 samples).
RingOnOffTime sets the ring rhythm of the phone itself: one second on, four seconds off.
Step 5: the dial plan
An analog phone has no “call” button. You pick up the handset and dial. On an analog phone network, each digit goes to the telephone exchange the moment you press the button, and the exchange does all the work. SIP works differently: a client, the ATA in this case, sends the complete phone number in a single request. So the ATA has to decide when the number is complete. That’s what the dial plan is for. This is mine:
*St4-|#St4-|112|1>#t5-|2.|3.|4.|55>#t1-|5^5|6.|7.|8.|9.|00S>#t5-|08S>#t5-|09S>#t5-|0^0.r7|0>#t5-
The rules are separated by |, and the ATA uses the first rule that fully matches. The most important symbols:
.matches any digit,^means “anything except”,tNis a timeout of N seconds,>#means you can press#to send the number right away,-allows more digits,Sstops looking at other rules, andrNrepeats the previous symbol N times.
The full syntax is in the Cisco ATA administrator’s guide on ManualsLib. Cisco itself no longer hosts the documentation, since the ATA186 has been retired for years.
| Rule | Matches | Behavior |
|---|---|---|
*St4- and #St4- |
Codes starting with * or # |
Sent after 4 seconds without input |
112 |
The emergency number | Sent immediately |
1>#t5- |
Other numbers starting with 1, like 14 numbers | Sent after 5 seconds, or when you press # |
2., 3., 4. |
Internal numbers on the three floors | Sent immediately after two digits |
55>#t1- |
55 followed by more digits | Sent one second after the last digit. This is a special case for the kitchen timer. |
5^5 |
The other services, 50–59 except 55 | Sent immediately after two digits |
6. to 9. |
Two-digit numbers, for future use | Sent immediately after two digits |
00S>#t5- |
International numbers | Sent after 5 seconds, or when you press # |
08S>#t5- and 09S>#t5- |
0800 and 0900 numbers, which vary in length | Sent after 5 seconds, or when you press # |
0^0.r7 |
A normal Dutch number: 0, a non-zero digit and 8 more digits | Sent immediately after the tenth digit |
0>#t5- |
Anything else starting with 0 | Sent after 5 seconds, or when you press # |
The result: internal calls connect the moment you dial the second digit, and normal phone numbers connect after the tenth. You only wait for numbers whose length can vary.
Step 6: a different ring for internal calls
An old phone has no display, so you can’t see who’s calling. But you can hear the difference. Internal calls ring with a different pattern than calls from outside, so you know whether it’s a housemate calling from upstairs or someone from the outside world.
The ATA can play several ring patterns. Which one it uses is decided by the SIP header Alert-Info in the incoming call. MikoPBX doesn’t set that header by default, but you can add it. Go to System files, pick /etc/asterisk/extensions.conf, set the mode to Append to end of file, and add:
[dial_create_chan-custom]
exten => s,1,NoOp(Distinctive ring)
    same => n,ExecIf($["${CHANNEL(channeltype)}" != "PJSIP"]?return)
    same => n,ExecIf($["${CHANNEL(endpoint)4}" == "SIP-"]?return)
    same => n,ExecIf($[${LEN(${CALLERID(num)})} > 0 & ${LEN(${CALLERID(num)})} <= 4]?Set(PJSIP_HEADER(add,Alert-Info)=Bellcore-dr2))
    same => n,return
MikoPBX runs dial_create_chan-custom for every outgoing channel it creates, so it’s a convenient place to add a header. The lines do this:
- Only SIP channels. Anything that isn’t a PJSIP channel is left alone.
- Not towards the provider. MikoPBX names provider endpoints
SIP-followed by an ID. Calls to the outside world don’t get the header. - Only internal callers. If the caller’s number has one to four digits, it’s an internal extension. Then the header
Alert-Info: Bellcore-dr2is added, and the ATA rings with that pattern. Calls from outside have a full phone number and ring normally. On my T65, an internal call rings as two shorter bursts instead of one long ring.
Bellcore-dr2 is one of a set of standard ring patterns that many ATAs and phones understand. In part 7, where the kitchen timer uses another one, you’ll find an overview of all patterns and what they sound like.
The T65 that wouldn’t ring
One of my T65s could make calls just fine, but didn’t ring when it was called. The cause turned out to be in the wiring: the EB terminal of the phone had to be connected to the b terminal. EB is for an extra bell (extra bel in Dutch), which was used in large spaces like offices and garages. The extra bell was connected between b and EB. Without an extra bell, EB had to be connected to b to make the phone’s own bell ring. You can make that connection at the screw terminals inside the phone, but it was often done inside the four-pin plug. Since I had replaced that plug with a modern cord with an RJ11 plug, I had to make the connection inside the phone instead. Someone on the KPN forum ran into the same problem with a modern modem.
Next up
The T65 can now call and be called. In part 4 we add cordless phones: a Gigaset N510 IP PRO DECT base station with five handsets.
-
Cisco’s documentation says the phone must be set to tone dialing. Koos van den Hout found this out the hard way with a rotary T65. ↩
-
On an American keypad, or any mobile phone, those digits spell FACTRESET. The T65, like most Dutch phones of its time, has no letters on its keys. ↩
-
The ITU keeps an overview of the tones used in national networks (PDF, the Netherlands is on page 20). Most other European countries use the same tones. ↩