In part 1 we looked at the building blocks of a home phone system. The heart of it all is the PBX. In this part we install MikoPBX in Docker on a Synology NAS. At the end you’ll have a running phone system with a web interface, ready for the first phones.
What you need
- A Synology NAS with Container Manager (Synology’s Docker package) installed. Mine is a DS920+. Any other NAS or home server will probably do, but some steps in this how-to are Synology-specific.
- SSH access to the NAS, for a few one-time commands.
- Optionally Portainer. I manage all my containers with it, so the examples below use Portainer. Container Manager’s Project feature or plain
docker composework just as well.
At the time of writing, I’m running DSM 7.3.2 and MikoPBX 2026.6.34.
Why MikoPBX?
As I mentioned in part 1, MikoPBX wasn’t my first choice. I looked at FreePBX first, which seems to be the go-to option for many people. The problem is that it’s designed as a complete operating system, so you need either a dedicated server or a virtual machine. My Synology can’t run a VM, due to an odd combination of factors.1 There are some Docker images for FreePBX, but they’re outdated. When I tried one, it needed a separate database container with its own password, which can get out of sync with FreePBX. Nobody seems to have made FreePBX run well in Docker. I also briefly looked at FusionPBX and Issabel, but their Docker images wanted to run with privileged: true, which gives a container nearly full access to the host.
So when I eventually found MikoPBX, I was very happy: a PBX that’s designed to run in Docker, with a fairly modern web interface too.
Step 1: a user and two folders
MikoPBX doesn’t run as root inside the container. You tell it which user to run as, and that user needs to own the folders where MikoPBX stores its data.
First, create a user for MikoPBX in DSM, under Control Panel → User & Group. It doesn’t need any permissions or apps; it only exists to own files.
Then log in to the NAS over SSH and look up the user ID (UID) and group ID (GID) of that user:
id mikopbx-user
You’ll get something like uid=1090(mikopbx-user) gid=100(users) groups=100(users). On a Synology, group 100 is the standard users group.
Finally, create the folders for configuration and storage, and give them to that user:
sudo mkdir -p /volume1/docker/mikopbx/cf /volume1/docker/mikopbx/storage
sudo chown -R 1090:100 /volume1/docker/mikopbx
Why over SSH? The permission screens in DSM, like those in File Station and the Control Panel, manage Synology’s own access control lists (ACLs). chown sets something else: the classic Unix owner of the folders. The MikoPBX documentation assumes a regular Linux server and gives the folders to the MikoPBX user with chown, and DSM’s interface has no option for that.
Step 2: the compose file
This is the compose file I use:
services:
  mikopbx:
    container_name: "mikopbx"
    image: "mikopbx/mikopbx"
    network_mode: "host"
    cap_add:
      - NET_ADMIN
    entrypoint: "/sbin/docker-entrypoint"
    hostname: "mikopbx-in-a-docker"
    volumes:
      - /volume1/docker/mikopbx/cf:/cf
      - /volume1/docker/mikopbx/storage:/storage
    tty: true
    restart: unless-stopped
    labels:
      - autoheal=true
      - com.centurylinklabs.watchtower.enable=true
    healthcheck:
      test: ["CMD-SHELL", "asterisk -rx 'core show uptime' | grep -q 'System uptime' || exit 1"]
      interval: 60s
      timeout: 10s
      retries: 3
      start_period: 300s
    environment:
      - ID_WWW_USER=1090
      - ID_WWW_GROUP=100
      - PBX_NAME=MikoPBX-Thuis
      - WEB_PORT=4444
      - WEB_HTTPS_PORT=4443
      - SSH_PORT=2223
Most of it comes straight from the MikoPBX documentation. The interesting parts:
Host networking
network_mode: "host" is the most important line. Telephony doesn’t like Docker’s default bridge network. SIP messages contain IP addresses and port numbers, and the audio (RTP) uses a whole range of ports that are negotiated during each call. Behind Docker’s NAT, that easily leads to calls where you can’t hear the other side, or calls that drop after 30 seconds. With host networking, MikoPBX uses the network interface of the NAS directly, and all those problems simply don’t exist. MikoPBX recommends this mode for the same reason.
The catch: every port MikoPBX uses is now a port on the NAS. If DSM already uses it, MikoPBX won’t start.
Ports
Because MikoPBX shares the ports of the NAS, the compose file sets WEB_PORT, WEB_HTTPS_PORT and SSH_PORT. By default MikoPBX wants ports 80, 443 and 22, and DSM already uses those. I moved them to 4444, 4443 and 2223. Pick any free ports you like. The telephony ports can stay at their defaults: 5060 for SIP and 10000–10800 for audio. DSM doesn’t use those.
User and group
ID_WWW_USER and ID_WWW_GROUP are the UID and GID from step 1.
Network permissions
cap_add: NET_ADMIN comes straight from MikoPBX’s official compose file. MikoPBX has a built-in firewall and fail2ban, which blocks IP addresses after too many failed login attempts. Both manage iptables rules. In host mode those rules live on the NAS itself, and the container needs this capability to manage them. That’s a narrow, targeted permission, much more limited than privileged: true. MikoPBX only needs full privileges for its built-in backup module, which you can skip: backing up the two folders below works just as well.
Volumes
/cf holds all configuration, /storage holds call recordings, voicemail and logs. As long as you keep these two folders, you can throw away and recreate the container without losing anything. They’re also what you back up. Stop the container while you copy them, so you get a consistent backup.
Health check
Every minute, Docker asks Asterisk (the engine inside MikoPBX) how long it has been running. If that fails three times in a row, the container is marked unhealthy. I run autoheal, which restarts unhealthy containers, hence the autoheal=true label. The long start_period gives MikoPBX five minutes to start: the first start in particular takes a while.
Automatic updates
The image has no version tag, so it’s always the latest release, and the watchtower label lets Watchtower update it automatically. That’s convenient, but it’s a trade-off: a bad release can take down your phones without you touching anything. If you’d rather be in control, use a fixed version tag and update by hand.
Step 3: deploy
In Portainer, go to Stacks → Add stack, give it a name, paste the compose file and click Deploy the stack.
The first start takes a few minutes. You can follow it in the container logs. MikoPBX is ready when you see:
All services are fully loaded
Step 4: first login
Open http://<ip-of-your-nas>:4444 in your browser. Log in with username admin and password admin, and change that password right away. The web interface is the key to your phone system, and to your phone bill once the outside line is connected.
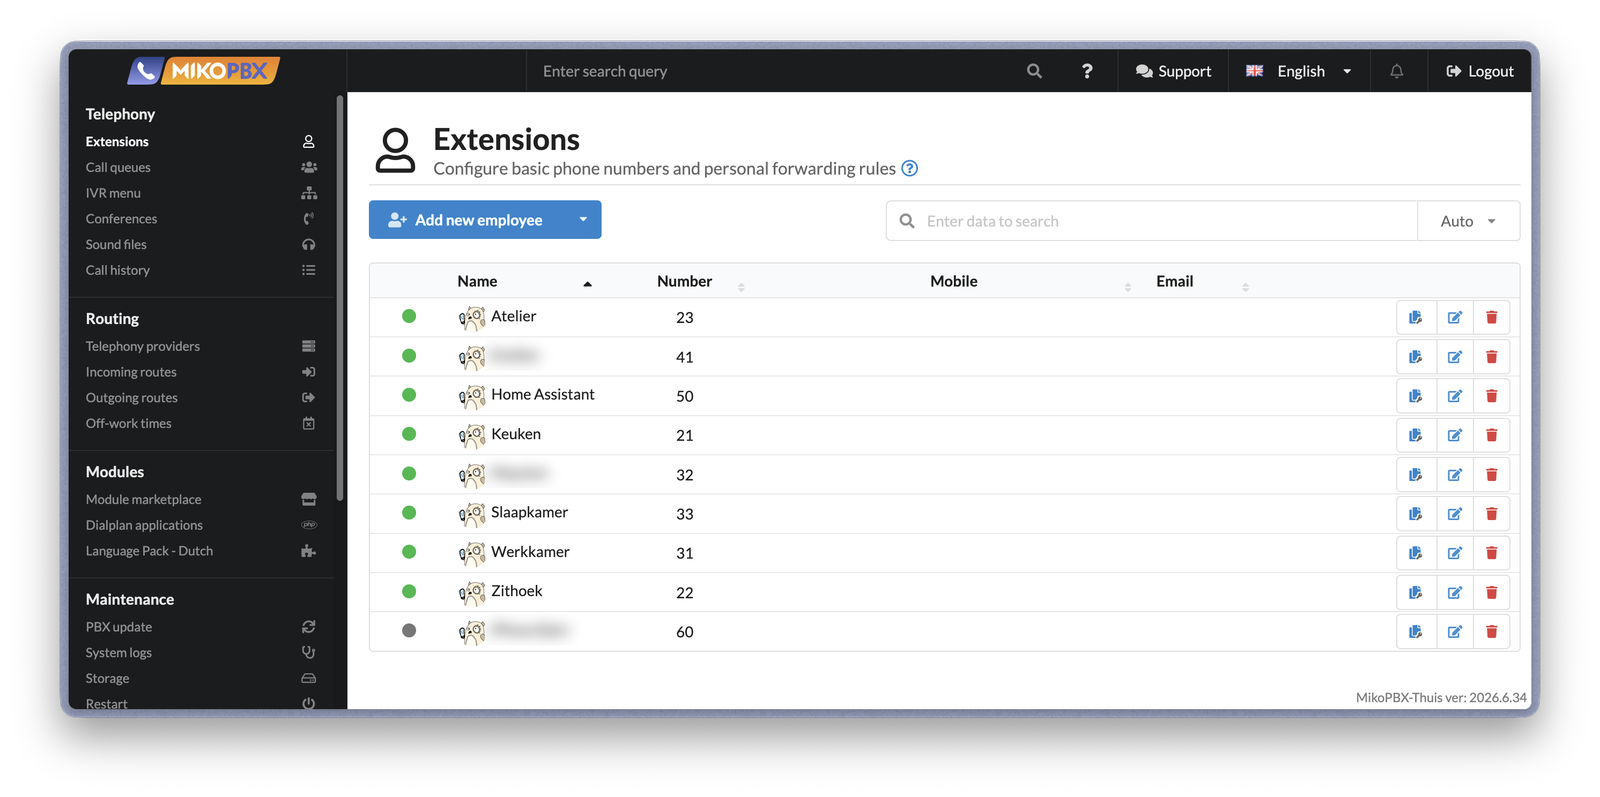
There’s not much to see yet. This is what it looks like once all phones from the next parts are connected:
Next up
The phone system is running, but nothing is connected to it yet. In part 3 we connect the first phone: a T65 via a Cisco ATA186.
-
Hardware-wise, a Synology DS920+ can run virtual machines with Synology’s Virtual Machine Manager (VMM). But VMM requires the Btrfs file system. I’ve been using Synology NAS devices for decades and have migrated a couple of times, so my disks still use ext4. That works fine for me, but VMM doesn’t support it. Converting is not easy, so I dropped the VM route when I found out. ↩